
How much time do people in your organization spend on completing tedious manual tasks? From gathering data to run an analysis to completing equipment request forms, these tasks can add up to serious lost time and productivity.
Fortunately, Microsoft has a tool designed to help you improve your workflows. Power Automate helps you create automated workflows for those daily tasks so your people’s time can be better spent focused on the core business functions and strategic projects you hired them for.
Today, we’ll look at how Power Automate fits within the larger Power Platform ecosystem, and how it can help improve productivity in your workplace.
Don't want to read the article? Watch the full recording below.
Be sure to register here for the "Microsoft and You" webinar series!
How the Microsoft Power Platform Works
Before we get too far in the weeds on automation, we should spend a little time explaining Power Platform, which runs Power Automate along with several other applications.
Power Platform was designed to help empower your users to glean insight from the data they interact with every day. Here’s an overview of the platform’s architecture, which we’ll break down in a moment:

Though today we’ll be focused on Power Automate, it helps to have context for how that application fits among the others that run on this platform. Let’s take them each one at a time.
Power BI
If your users want to dig deep into data, Power BI is a great tool to help. This application gives them the ability to connect with and visualize any data your organization has. It readily plugs into programs like Excel, as well as internal and external databases, to unify data into a self-service, scalable solution.
Power Apps
Want to build your own applications? Power Apps gives you the ability to build programs that can run within Windows, or web programs that can be pushed out to mobile devices, including those running iOS or Android. It’s also designed to be simple — you don’t need a high-end developer degree to create applications in Power Apps.
Power Virtual Agents
If you’d like to create an AI chat bot, you can do it through Power Virtual Agents. Depending on the level of sophistication you need, you can use this application to provide answers to simple or common questions. Or, you can add nuance and depth to resolve complex conversations.
Power Pages
Power Pages is a new application on the platform, created to help you build external facing websites. Within the app are templates, design studios, and a modular framework that makes it easy to create and launch your design even without the skills of an advanced web developer.
Power Automate
This app is what we’re here to discuss, and in some ways Power Automate is the heart of the whole Power Platform. Almost every other application on the platform will have opportunities for automation, and this app is how you’ll do it.
Any business process that users perform the same way every time can be fed into an automated workflow using this app.
It provides a way for users to connect their accounts and leverage a set of prebuilt actions and triggers to build their apps and workflows.
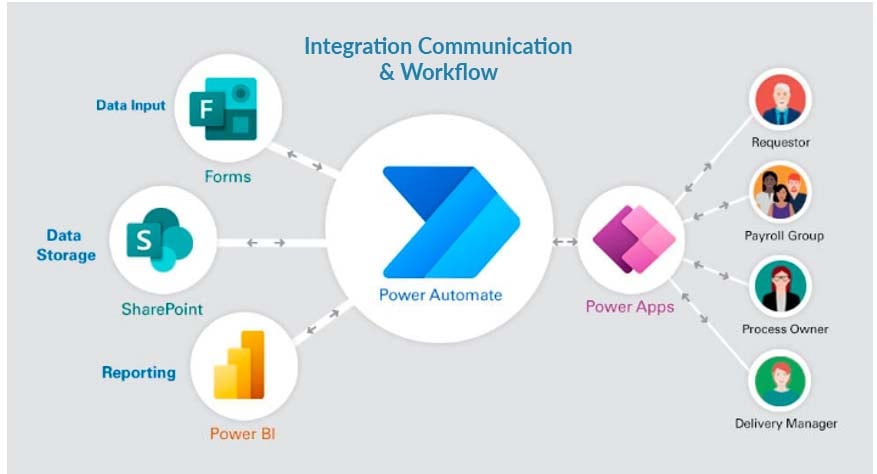
As you can see in the illustration above, Power Automate serves as the connection between data input, storage, and reporting and the power apps that serve your users. This role makes it a standout player among all other Power Platform apps.
Understanding the Key Aspects of Microsoft Power Platform
While each application within the Power Platform has its own specific purpose and function, there are some common threads that knit them together. Understanding these three key aspects of the platform may help you see how each of them clicks together as a piece of a much larger puzzle.
1. Data Connectors
Each of the above apps offers users a way of connecting their accounts to leverage a set of prebuilt actions and triggers to build their applications and workflows. By making connections between things like Excel, Salesforce, Office 365 and other programs, users can get the maximum benefits from these tools without needing advanced development skills.
2. AI Builder
Artificial intelligence helps drive these new workflows, making sense of what’s being asked and identifying opportunities for improvement. AI helps drive the apps and makes them simpler to use for your team.
3. Dataverse
The “dataverse” refers to the secure data storage solution that protects all the information being collected and connected by the Power Platform applications. This ensures information security while data is being shared by your systems, and is held in common by all the apps that you use.
How Much Does Microsoft Power Platform Cost?
One of the best things about Power Automate is that most of the tools are accessible to anyone with even a basic Microsoft 365 SKU.
In other words, if you’re using a business premium account, Microsoft Business Standard, E3 or E5, all will include use rights for Power Automate:
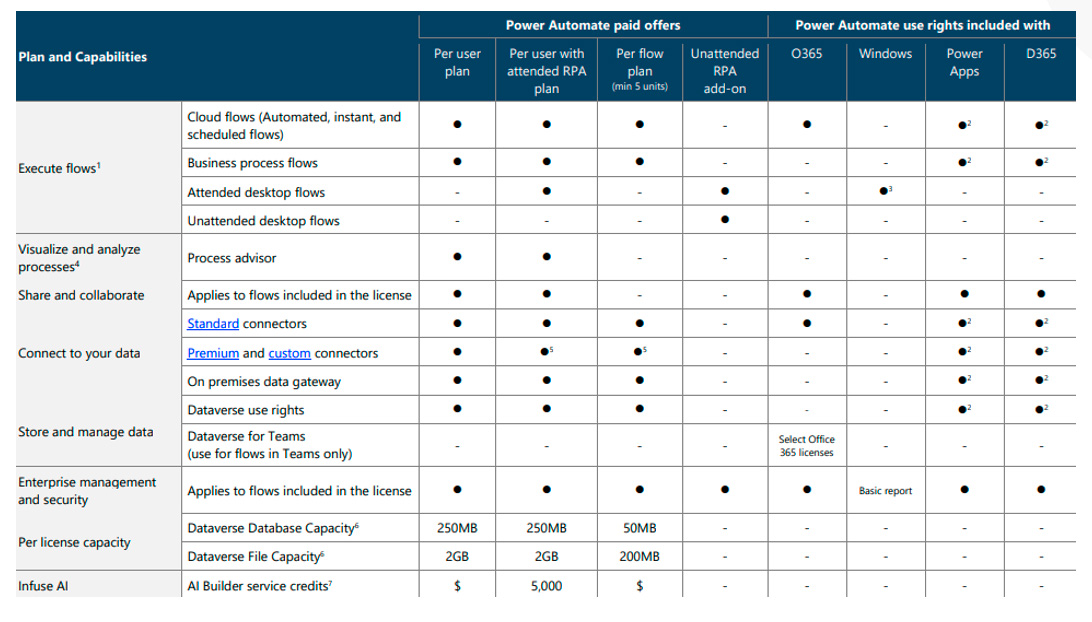
If you would prefer a per-user or per-app plan, those can range from $5 per person all the way up to $20 per person, or you can pay on a per-use flow basis. It just depends on what you and your users need, and how you plan to build out your applications.
An Example of Power Automate in Action
We’ve taken a high-level view of Power Automate so far, but it might be helpful to walk through a more concrete example of how you might use the application in your job. In this case, our hypothetical scenario will be that you’d like to create an automation for your users to request a new laptop.
Here’s how you could use Power Automate to build that workflow.
Watch the real-time walkthrough of Power Automate in our webinar.

Step 1: Create a Request Form
Before you open up Power Automate, you’ll want to create the laptop request form. This means defining field like “Requestor,” “Order Number,” “Shipping Location,” and any other information you would need for a standard laptop request. You want to be sure that this form is set up to collect any data you’ll need to complete (or reject) the request.
Step 2: Tailor a Power Automate Template to Your Needs
Once you’ve created your request form, now it’s time to open Power Automate and search through the ready-made templates. Your goal is to find a workflow template that fits your needs as closely as possible — but remember that you can make changes. Once you’ve selected your template, you’ll want to refine it to make sure it makes sense for your organization.
Step 3: Identify Your Trigger
A “trigger” is an action that initiates the automatic workflow. In this example, what triggers the workflow would be when a user completes the laptop request form and submits it to the system. This tells Power Automate to follow the procedures you’ve laid out to complete the task.
Step 4: Define Workflow
Once the form is submitted, what happens next? At this stage you want to obtain the data from the form and deliver it where it needs to go. In this example, that would be the manager who needs to approve or reject the laptop request.
Step 5: Define Where Data Is Stored
As data is sent through your system, it needs to be stored in a consistent way. Here you’ll define the location and library the file is in so that the information can be readily accessed. That should include details like the order number and information as well as the submission time for the laptop request.
Step 6: Test Your New Automated Workflow
Once you’ve created your workflow, it’s time to test that it works. In this example, you would fill out a laptop request form the same way a user would do it, then watch in Power Automate to make sure everything proceeds the way it’s supposed to. If it doesn’t, you can inspect and edit the flow to make any necessary corrections before testing the workflow again.
Step 7: Share the Automated Process with Your Team
All good? Great! Once the workflow is built, it’s time to share it with the rest of your team. Drop the new form into a Teams channel and let your users take it from there.
While this might be a simple example, Power Automate is equipped to handle much more complex and time-consuming tasks. We recommend you spend time exploring the application to discover just how much it can streamline your users’ day-to-day activities.

About the author

Explore Our Latest
Resources and Articles


.png?width=500&height=334)

-1.jpeg?width=500&height=317)